

Setting up a GCP Service account
Pre-requisite for future GCP blog posts

Data Engineer at Media.Net | Sharing my learnings and experiences in tech.
Introduction
A service account in Google Cloud Platform (GCP) is a special type of account that allows applications running on GCP to interact with other GCP services, such as Google Cloud Storage, Google Cloud SQL, and Google Compute Engine.
Service accounts are typically used by applications that run on GCP, such as virtual machines, containers, and applications running on Google Kubernetes Engine. Using service accounts, applications can securely access GCP resources without requiring users to authenticate individually.
Each service account is associated with a set of credentials, which typically include a private key that can be used to authenticate the service account with other GCP services. Service accounts can also be granted specific permissions to access particular resources, making it easy to control access to GCP resources on a per-service basis.
In this blog post, I will guide you through the step-by-step process of creating a service account on the Google Cloud Platform (GCP). This account will be specifically created to be used for my future blog posts on GCP. By following this tutorial, you will be able to create a service account and obtain the necessary credentials to interact with other GCP services.
The instructions provided in this post will be concise and easy to follow, ensuring that you can complete the process quickly and efficiently. In case you need to create a service account in the future, you can refer back to this post for guidance. Let's get started!
Creating a Service Account
Sign in to your google cloud console at https://console.cloud.google.com.
From the dropdown at the top, select the project you want your service account to be associated with.
From the navigation menu on the left-hand side, select "IAM & Admin" and then select "Service accounts".
Click the "Create service account" button at the top of the page.
Enter a name for your service account and provide an optional description. Click "Create and Continue".
Under the "Grant this service account access to project", select the following roles to be assigned to the service account and click "Continue" (you can modify the roles as per your requirements):
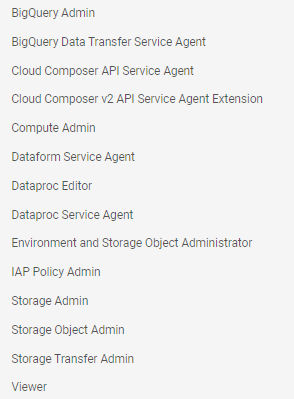
Click "Done".
Creating a Service Account Key
From the navigation menu on the left-hand side, select "IAM & Admin" and then select "Service accounts".
Locate the service account that you created and click on its name.
Click on the "Keys" tab and then click "Add Key".
Click on the "Create new key" button, select "JSON" as the Key Type and click "Create".
This will download the JSON key file to your local machine.
Setting up the environment variable
One last thing is to create an environment variable GOOGLE_APPLICATION_CREDENTIALS and point it to the path of the downloaded key file.
Conclusion
Now, you have a service account that can be used to interact with other GCP services and infrastructure management (through IaaC tools like Terraform etc.) as well.
To learn more about service accounts, you can go over the official documentation here: https://cloud.google.com/iam/docs/service-account-overview
I hope you found this blog post helpful and informative. I'd love to hear your thoughts on the topic or any issues you've had following along. Did I miss anything important? Please leave a comment below and let me know what you think. Your feedback is valuable and can help me improve my writing and provide additional insights for other readers. Thank you for taking the time to read this post!


