

How to set up my Yelposhere data engineering project on GCP?
Data Engineering Zoom Camp 2023

Data Engineer at Media.Net | Sharing my learnings and experiences in tech.
What is YelpoSphere?
YelpoSphere is a data pipeline that extracts, transforms, and loads data from Yelp's public dataset into a GCP environment and performs various analyses on the data. The pipeline combines GCS, BigQuery, Dataproc, Cloud Composer, Cloud Run and Cloud Build for data processing.
YelpoSphere helps users provide insights into the restaurant business.
It performs the following tasks:
Loads the Yelp data into the GCS bucket.
Clean, preprocess and ingest data from GCS to BigQuery using Dataproc.
Uses DBT to normalize the data and performs exploratory data analysis (EDA) to identify trends and insights.
Visualizes the results using Google Data Studio.
Orchestrates different tasks using Cloud Composer.
This is also my capstone project for the Data Engineering Zoomcamp 2023!
Where's the data coming from?
The dataset is taken from the Official Yelp Open Dataset website. It is a subset of Yelp's businesses, reviews, and user data for personal, educational, and academic purposes. It is available in JSON files.
Here's a list of files available:
business.json: Contains business data including location data, attributes, and categories.reviews.json: Contains full review text data including the user_id that wrote the review and the business_id the review is written for.user.json: User data including the user's friend mapping and all the metadata associated with the user.checkin.json: Checkins on a business.tip.json: Tips are written by a user of a business. Tips are shorter than reviews and tend to convey quick suggestions.
For a detailed description of the schema and examples, please visit the official documentation website.
Edit: The above data along with BigQuery tables and the Google Studio dashboard is now deleted. So you may have to download the data directly from the official website.
What is the tech stack?
Data Storage: Google Cloud Storage (GCS)
Data Processing: Dataproc
Data Transformations: Data Build Tool (DBT)
Workflow Orchestration: Cloud Composer
Infrastructure: Terraform
Programming Language: Python
Data Visualization: Google Data Studio
Extras: Cloud Build, Cloud Run
What does the pipeline look like?
Here's a complete overview of the pipeline:

When an airflow DAG starts:
It copies the data from a public GCS bucket into the project's data lake.
It will wait for files to come in the GCS bucket's
data/rawfolder.Once the files are received, it submits Dataproc jobs to the cluster to ingest data into BigQuery raw tables.
Once the data is ingested into raw tables, it will send a GET request to Cloud Run which will execute DBT jobs.
DBT will perform transformations and load the data into a final dataset, making it ready for visualization.
This final dataset acts as a source for Google Data Studio which creates a dashboard using it. On the other hand:
When commits are pushed to the main branch of the repo, a new Cloud Build is triggered.
This creates a new docker image that gets deployed on Cloud Run.
This ensures that DBT commands perform up-to-date transformations.
Note: Cloud Build and Cloud Run are used to dockerize the DBT project and run DBT commands. This is required because Airflow does not have any convenient operators to run DBT core commands. And scheduling DBT cloud jobs is not supported in the FREE plan of DBT.
In short, it is a workaround to orchestrate DBT with Cloud Composer.
What do I need to run this pipeline?
Operating System
Prefer Linux for this data pipeline. This is because Terraform throws EOF errors on Windows unexpectedly, causing inconvenience.
You can use Google VM in case you're having a Windows machine.
Tools
Python
Terraform
Git
Refer to the following blog for installation instructions on Python (Anaconda) and Terraform:
GCP Resources
A GCP Project
A service account
GCloud CLI
Setting up the service account
You can refer to the following blog for general instructions on creating a service account and managing keys:
But, here are the roles that are required for this pipeline:
Cloud Run
Cloud Run Service Agent
Composer Worker
Compute Admin
Dataproc Administrator
Environment and Storage Object Administrator
Secret Manager Secret Accessor
Storage Admin
Storage Object Admin
Storage Transfer Admin
Additionally, you'll need to give one more access to this service account:
In your GCP console, go to IAM > Service Accounts and select your service account.
Go to Permissions > Grant Access

You need to add your default compute service account as a new principal. It follows the format
{your-project-number}-compute@developer.gserviceaccount.comand you can locate your project number in the project settings. Once you have identified your project number, simply add the default compute service account as a new principal and grant it theCloud Composer v2 API Service Agent Extensionrole.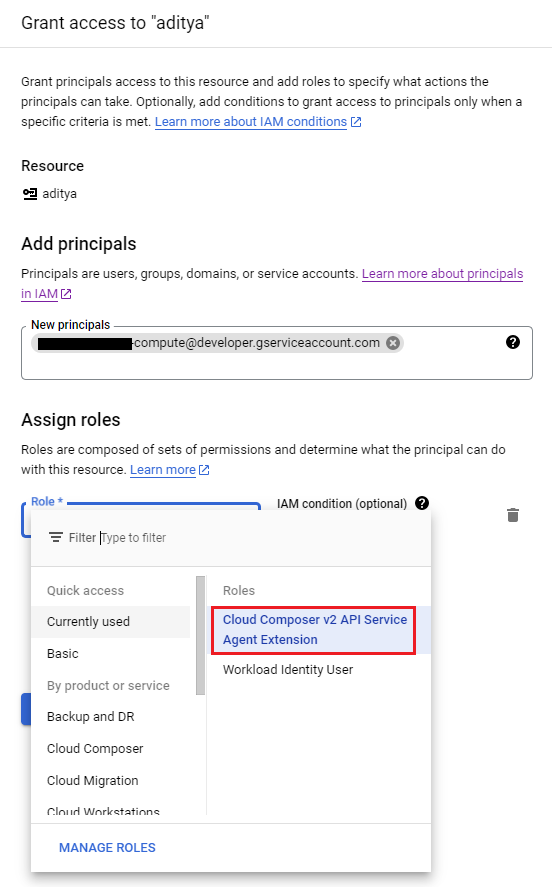
`
Note: You should have an environment variable named
GOOGLE_APPLICATION_CREDENTIALSwhich points to the location of the key file of the service account. This is necessary for Terraform to manage resources on your behalf.Command:
export GOOGLE_APPLICATION_CREDENTIALS=/path/to/keyfile.json
Setting up the GCloud CLI
Download the installer from here and install the CLI app.
Run the following command (assuming that you have the
GOOGLE_APPLICATION_CREDENTIALSenvironment variable pointing to your service account key file):
gcloud auth activate-service-account --key-file $GOOGLE_APPLICATION_CREDENTIALS
If you're on Windows, you can provide the path to the key file instead of the environment variable.
Setup your pipeline
Tip: Throughout the process, enable any Google APIs that you're prompted to.
Step 0: Get the code
Fork the repository (This is important!)
Clone the forked repo.
git clone <forked-repo-git-url>
cd yelp-gcp-infrastructure/terraform
Step 1: Modify the DBT env variable
In the dbt/Dockerfile, modify the value of the GCP_PROJECT environment variable with the value of your project id. (Specifically, this line)
Commit and push the changes to your repository.
Step 2: Save the SA key file in Secret Manager
DBT will require the service account key file to connect to BigQuery and execute transformations. This key file can be stored as a secret in the Secret Manager and accessed inside DBT's profile.yml file from Cloud Run.
Go to Secret Manager > Create Secret. (You may need to enable the Secret Manager API)
Give
dbt-service-keyfileas the name of the secret. (Name should exactly match this!)Click on Browse and upload the service account key file as the Secret Value.
Click Create.
Here's the secret overview

:
Step 3: Setup Cloud Run and Cloud Build for DBT
Go to Cloud Run > Create a Service.
Select
Continuously deploy new revisions from a source repository> Setup with Cloud Build.
Click on "Manage connected repositories", sign in to your GitHub account and install the Build Agent on the forked repo only. Then click on Next.
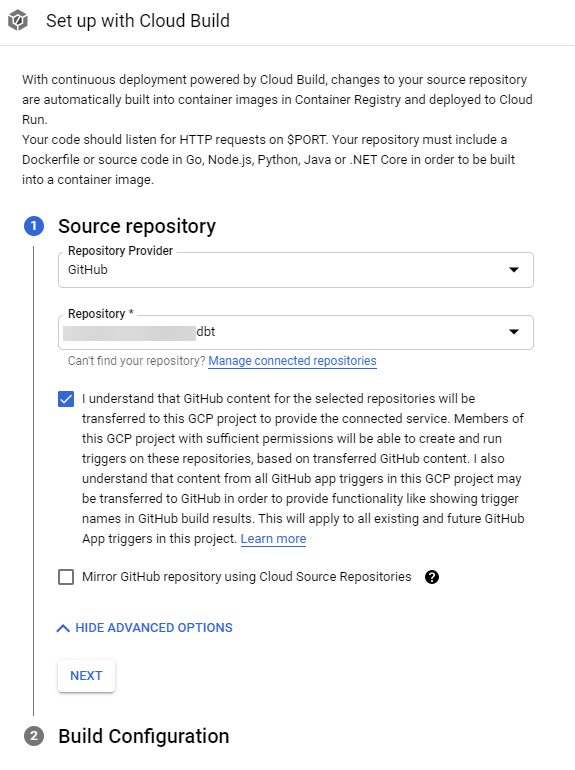
Select "Dockerfile" as the build type and provide the file path as
/dbt/Dockerfile. Click Save.
Give your Cloud Run service a name. Pick a region. This region should be the same as that of your BigQuery dataset (to be configured in the further steps). And then select "Require Authentication".
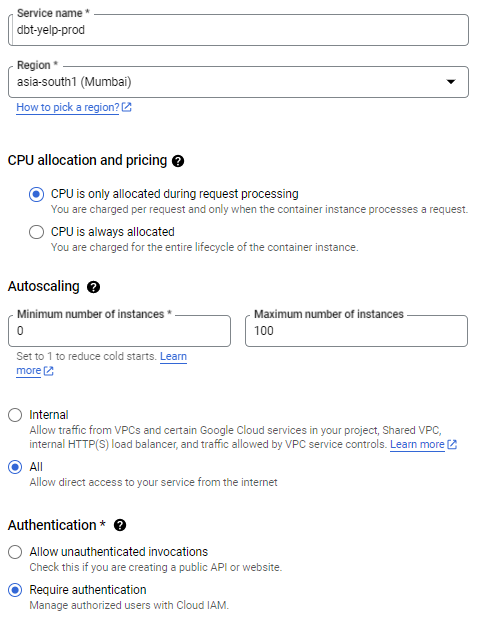
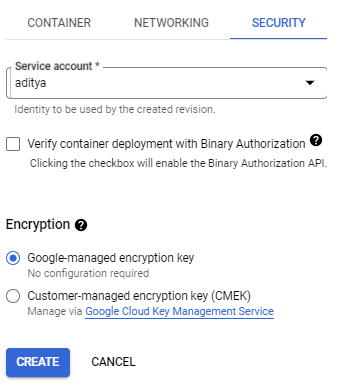
Expand the "Container, Networking, Security" section. Inside the Container section, choose Maximum requests per container to be 1.

Under the Secrets section, select "Reference a Secret". Select the secret you created in the previous step. Reference method as "mounted as volume", and mount path as
secrets.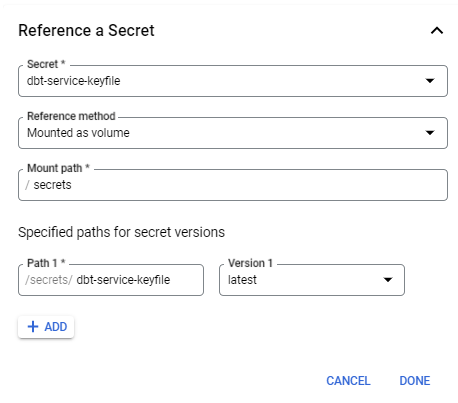
Now, under the Security section, select your service account and click Create.
Your Cloud Run service is ready. Go inside your service and you'll find an endpoint for this service. Copy this as you'll need it in future steps.

Now you have set up your DBT code to run.
A drawback of this workaround is that you can't view the data lineage or documentation. If you want to view that, you can always set this up using the DBT cloud as described in the course video:
(Optional) Understanding DBT Transformations
Let me walk you through the use of DBT in this pipeline. It is responsible for:
Partitioning
stg_businessestable on theis_opencolumn. This will help others in querying this data on the basis of open or closed businesses, as per the requirement.Creating different data models to answer business questions that will be used to create the final dashboard.
You can go through the data model code to understand how exactly they look.
Step 4: Build your infrastructure using Terraform
Go to terraform/terraform.tfvars file and modify the fields marked with "TODO", with appropriate values.
As of now, all the resources are created in the asia-south1 region except for Cloud Composer which is created in us-central1 region (I suggest not changing the region for Cloud Composer). For the rest of the resources, assign the same region if you want to change it.
The GCS buckets should have a globally unique name which is why you may have to rename them in the file.
The terraform variable "datalake_name" will be the name of the GCS bucket for your pipeline which will contain all your data and spark jobs. You'll need it in the next step.
Also, make sure to change the service account for cloud composer (in that same file) to your service account's email.
After modifying the necessary fields, run the terraform command:
terraform apply
Enter "yes" when prompted and wait for completion.
Here's what Terraform is doing behind the scenes:
Enables the required GCP APIs to work with different resources.
Creates the project's data lake with Spark ingestion scripts inside the
scriptsfolder.Creates BigQuery dataset and tables with defined schema.
Creates a Dataproc cluster.
Creates a Cloud Composer environment and uploads the Airflow DAG into it.
Once the resources are created, it generates output with a list of resources created and some metadata that is required in the later steps. (All the output values are defined in this file.)
A note on Cloud Composer
Cloud Composer generally takes around 20-30 mins for successful creation. But during the development, I observed that it might fail randomly due to timeout issues at the backend and throw errors stating permission issues. When it fails, it takes around 45-50 mins to throw the error. 😤
Now, if you have correctly set up your service account as mentioned earlier, you have no issues with permissions. In such cases, you can try running Terraform once again by changing the name and region of the composer environment. I've found us-central1 to be the most reliable till now.
Or you can manually create Composer (Composer 2) in the console and give the name, region, and service account and click Create. Once the environment is created, go inside it and click on "Open DAGs Folder".

This will open a GCS bucket where the composer stores all the Airflow DAGs. Click on "Upload files" and upload the cloud_composer/ingest_data_dags.py file. This contains the DAG for this project.

Once the DAG is uploaded, you can move on to the next steps.
Step 6: Upload Airflow variables using Airflow UI
I've used Airflow variables to pass dynamic values to the DAG. These values are related to infrastructure like the BigQuery table names, Dataproc cluster names, the path of the spark jobs etc.
You can get these values from the terraform output. Run the following commands (inside the terraform folder) to get these variables in a JSON file to easily upload them to Airflow.
terraform output -json > ../tf_output.json
cd ..
python utils/get_variables.py --input tf_output.json --output  airflow_variables.json
You will get airflow_variables.json file that you can upload to the Airflow UI using the following steps:
In the composer environment, click on "Open Airflow UI". You will be redirected to an Airflow dashboard.
Go to Admin > Variables.

Click on "Choose File". Select the airflow_variables.json file and click on "Import Variables".
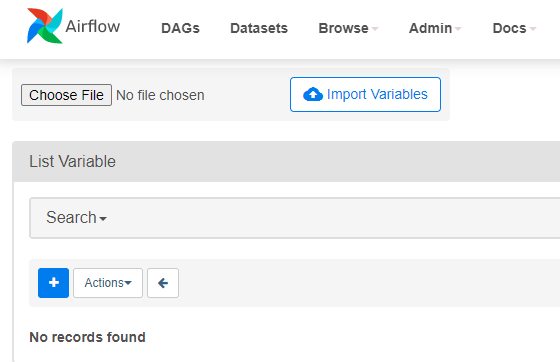
This will upload 16 variables to Airflow.
Similarly, select the
data_paths_airflow_variables.jsonfile already present in the repo and import variables from this file as well.This uploads 5 more variables to Airflow.
Step 7: Create a Cloud Run connection in Airflow
As I mentioned in the overview section, Airflow needs to send HTTP requests to Cloud Run. So you need to create an Airflow HTTP connection for it to connect to Cloud Run's endpoint. Follow the steps to do so:
In the Airflow UI, under the Admin tab, click on Connections.
Click on the + Icon.
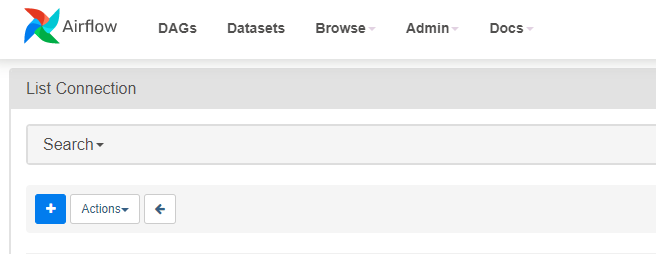
Select connection_id as "cloud_run", connection type as "HTTP" and host as your Cloud Run service endpoint. Click on Save.

At this point, you can refresh your Airflow UI until there are no import errors shown at the top of Airflow UI. (It may take a few seconds for errors to resolve)
Before:

After:

This means that your DAG is imported successfully to Airflow and now we just need to run it.
Step 8: Run the Airflow DAG
Finally, you get to run your DAG and visualize the progress. Click on the process_yelp_data DAG followed by the play button and then "Trigger DAG".

This will start the DAG as you can see on the UI:

You can also see the DAG under the "Graph" tab:
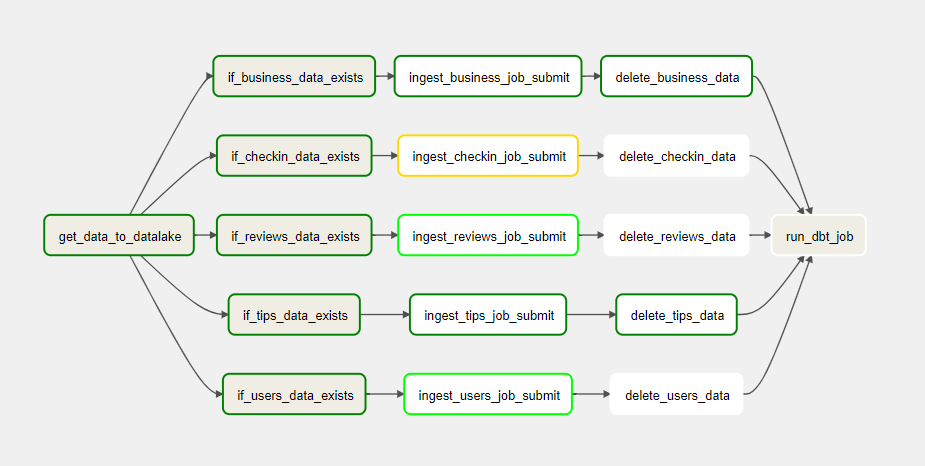
Here's what's happening:
It gets the data from a public bucket into the data lake.
It checks if the files are present in the location given by airflow variables, which is the data lake URL.
If yes, it will submit a spark job to the Dataproc cluster to load that particular file into BigQuery.
Once the spark job succeeds, the JSON files are deleted.
And finally, a GET request is sent to the Cloud Run endpoint to execute DBT transformations and tests.
You can see all the DBT models created under the yelp_dbt dataset in BigQuery.
Note that a task may fail, but that is probably because of the less memory in Airflow. In this case, you just have to wait until it retries itself.
And here it gets completed:


Step 9 (Optional): Create a dashboard with Google Data Studio
I have used Google Data Studio to create a dashboard on top of the DBT models. You can either create your dashboard or simply view my dashboard here:
EDIT: Please refer to the screenshot below as the dashboard is removed.
Here's a screenshot of my dashboard in case you're having any trouble viewing it:

Pretty cool, isn't it? 😉

PS: I'll leave out the steps to create a dashboard on google data studio as I believe it is very convenient and self-explanatory since it is a drag-and-drop tool.
Clean up your GCP Resources!
Well, this is important because:

And if you don't clean it, then ...

So better clean it up as soon as you're done checking out the project. Here are the steps to do it:
Inside the
terraformfolder, run theterraform destroycommand and enter yes when prompted. It'll take a few minutes.Once done, check your GCS buckets and delete any remaining buckets.
(Generally, Composer's GCS bucket doesn't get deleted with Terraform destroy and has to be manually deleted.)
Then go to Cloud Build, Cloud Run, Artifact Registry, and Secret Manager to delete everything present there.
That's it.
Now What?
Since now you got to build the data pipeline (and destroy it 😂), here are a few things that I think can be improved:
Better code structure for Terraform.
More data transformations on DBT.
Adding more data quality tests on DBT models.
Research about any easier way to orchestrate DBT with Airflow (although I did a LOT of research and asked a lot of different communities about this)
CI/CD Pipeline
Conclusion
This was my capstone project for the Data Engineering Zoomcamp.
I hope you like it. If you have any questions about the project, face any problems while following along, or have a suggestion for me, feel free to comment or drop me a DM on Twitter or Linkedin.


